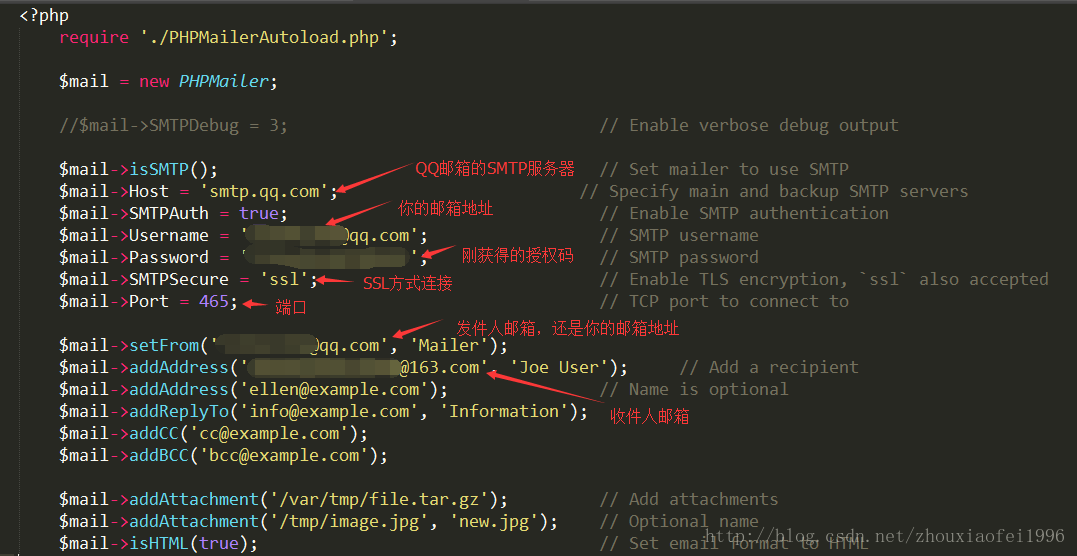
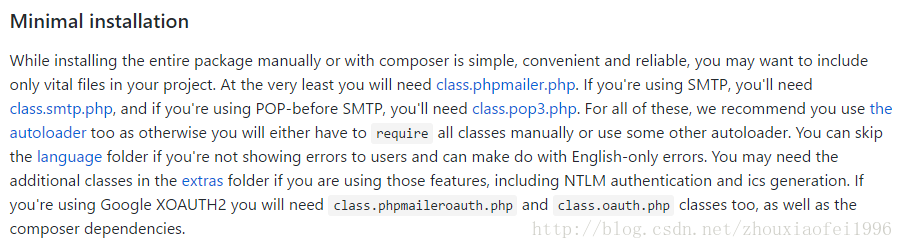
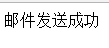
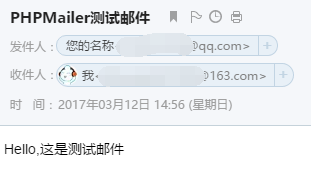
导航
导航
文章目录
  1. PHP 自带的 mail() 函数
  2. 封装的 smtp 邮件发送类
  3. 最小化安装(推荐)

PHP 实现邮件发送(PHPMailer+QQ邮箱)

最近复习原生 PHP,看到邮件函数这一部分,就试着写一下邮件功能,在网上搜了一下,主要有两种实现方式:

  1. PHP 自带的 mail() 函数
  2. 封装的 smtp 邮件发送类

下面来一一介绍

PHP 自带的 mail() 函数

浏览一下 PHP 文档,mail() 函数的注释如下:

即若要使用 mail() 函数,需要本地安装一个邮件系统或者必须设置一台不需要中继的邮件发送服务器,但现在要找到一台不需要身份验证的邮件发送中继几乎不可能,所以使用 mail() 函数往往无法成功发送电子邮件,对使用邮件系统感兴趣的,可以自己研究。而使用封装的smtp邮件发送类来实现,则要方便的多。

封装的 smtp 邮件发送类

封装的smtp邮件发送类,网上可以找到很多,其中开源的 PHPMailer 是其中比较流行的一个,只需简单配置,即可使用,想了解更多,请移步 PHPMailer PHPMailer开源地址:https://github.com/PHPMailer/PHPMailer

可以直接把项目 clone 下来,或者下载 zip 压缩文件,在配置之前,需要开启邮箱的 smtp 功能,这里以 QQ 邮箱为例:

登录 QQ 邮箱,点击设置

账户

拉到最后,找到

根据提示,开启前两项服务,然后生成授权码,记下来,之后配置会用

clone 下来的 PHPMailer 项目的 README 文件提供了一个简单的引入例子
A Simple Example

1
2
3
4
5
6
7
8
9
10
11
12
13
14
15
16
17
18
19
20
21
22
23
24
25
26
27
28
29
30
31
32
<?php
require 'PHPMailerAutoload.php';
$mail = new PHPMailer;
//$mail->SMTPDebug = 3; // Enable verbose debug output

$mail->isSMTP(); // Set mailer to use SMTP
$mail->Host = 'smtp1.example.com;smtp2.example.com'; // Specify main and backup SMTP servers
$mail->SMTPAuth = true; // Enable SMTP authentication
$mail->Username = 'user@example.com'; // SMTP username
$mail->Password = 'secret'; // SMTP password
$mail->SMTPSecure = 'tls'; // Enable TLS encryption, `ssl` also accepted
$mail->Port = 587; // TCP port to connect to

$mail->setFrom('from@example.com', 'Mailer');
$mail->addAddress('joe@example.net', 'Joe User'); // Add a recipient
$mail->addAddress('ellen@example.com'); // Name is optional
$mail->addReplyTo('info@example.com', 'Information');
$mail->addCC('cc@example.com');
$mail->addBCC('bcc@example.com');

$mail->addAttachment('/var/tmp/file.tar.gz'); // Add attachments
$mail->addAttachment('/tmp/image.jpg', 'new.jpg'); // Optional name
$mail->isHTML(true); // Set email format to HTML
$mail->Subject = 'Here is the subject';
$mail->Body = 'This is the HTML message body <b>in bold!</b>';
$mail->AltBody = 'This is the body in plain text for non-HTML mail clients';
if(!$mail->send()) {
echo 'Message could not be sent.';
echo 'Mailer Error: ' . $mail->ErrorInfo;
} else {
echo 'Message has been sent';
}

在 PHPMailer 文件夹下,新建一个 index.php 文件,复制粘贴以上代码,修改各项配置

由于使用了 SSL 连接,所以需要开启PHP的 openssl 扩展,这里不再赘述,配置完之后,放在 Web 服务器下,访问 index.php,正常的话,就能收到一封测试邮件了,如果失败,可以根据报错信息进行排查。

最小化安装(推荐)

直接把整个 PHPMailer 项目放到服务器上,未免太浪费空间,而且项目中的许多文件都是没用的,所以 README 文件中也提到了最小化安装

文中提到 class.phpmailer.php 是必需的,另外的文件是可选的,因为我们使用的是 SMTP,所以还需要class.smtp.php,如果你使用了 POP3,则需要引入 class.pop3.php,新建一个 Mail 文件夹,导入以上两个文件,新建 index.html,send.php,文件结构如下:

两个文件代码如下

index.html

1
2
3
4
5
6
7
8
9
10
11
12
13
14
15
16
<!DOCTYPE html>
<html lang="zh-CN">
<head>
<meta charset="UTF-8">
<title>phpmailer Unit Test</title>
</head>
<body>
<h3>phpmailer Unit Test</h3>
请你输入<font color="#FF6666">收信</font>的邮箱地址:
<form name="phpmailer" action="./send.php" method="post">
邮箱地址: <input type="text" size="50" name="address" />
<br/>
<input type="submit" value="发送"/>
</form>
</body>
</html>

send.php

1
2
3
4
5
6
7
8
9
10
11
12
13
14
15
16
17
18
19
20
21
22
23
24
25
26
27
28
29
<?php
require("class.phpmailer.php"); //下载的文件必须放在该文件所在目录
require("class.smtp.php");
$mail = new PHPMailer(); //建立邮件发送类
$address = $_POST['address'];
$mail->IsSMTP(); // 使用SMTP方式发送
$mail->CharSet='UTF-8'; // 设置邮件的字符编码
$mail->Host = "smtp.qq.com"; // 您的企业邮局域名
$mail->SMTPAuth = true; // 启用SMTP验证功能
$mail->SMTPSecure = "ssl";
$mail->Port = "465"; //SMTP端口
$mail->Username = "xxx@qq.com"; // 邮箱用户名(请填写完整的email地址)
$mail->Password = "xxx"; // 授权码
$mail->From = "xxx@qq.com"; //邮件发送者email地址
$mail->FromName = "您的名称";
$mail->AddAddress("$address", ""); //收件人地址("收件人email","收件人姓名")
$mail->AddReplyTo("", "");
$mail->AddAttachment("/var/tmp/file.tar.gz"); // 添加附件
$mail->IsHTML(true); // set email format to HTML //是否使用HTML格式
$mail->Subject = "PHPMailer测试邮件"; //邮件标题
$mail->Body = "Hello,这是测试邮件"; //邮件内容
$mail->AltBody = "This is the body in plain text for non-HTML mail clients"; //附加信息
if(!$mail->Send()){
echo "邮件发送失败. <p>";
echo "错误原因: " . $mail->ErrorInfo;
exit;
}
echo "邮件发送成功";
?>

配置参数和上面的一样,不再赘述,之后点击 index.html 文件

输入邮箱地址就可以啦

以上代码均为测试,若用于生产环境,可以对其进行封装
如有问题,欢迎回复交流